Getting user feedback is essential to improve your Flutter application. The easier you make this process the more feedback you will receive. In this post, you will learn how to allow the user to submit user feedback including screenshots, drawings, and a description. You will also learn how to enable the user to send the feedback to you via email.
Table of contents

Install Feedback Package to Get User Feedback in Flutter
To start, we need to install the Feedback package into our project. The installation process is simple. Just execute the following command:
flutter pub add feedbackOnce the command is executed, make sure to check your pubspec.yaml file for the added dependencies. You should see the Feedback package included in the dependencies, like this:
dependencies:
  feedback: ^3.1.0
Open the User Feedback Pop-Up
After successfully installing the package we can start by implementing the BetterFeedback widget inside our project.
import 'package:feedback/feedback.dart';
import 'package:flutter/material.dart';

void main() => runApp(
      const BetterFeedback(
        child: MyApp(),
      ),
    );

class MyApp extends StatelessWidget {
  const MyApp({super.key});

  @override
  Widget build(BuildContext context) {
    return MaterialApp(
      home: Scaffold(
        body: Center(
          child: ElevatedButton(
            onPressed: () => BetterFeedback.of(context).show((_) {}),
            child: const Text('Give Feedback'),
          ),
        ),
      ),
    );
  }
}
In this code snippet, we start by wrapping the whole application with the BetterFeedback widget. This is needed because this widget should be the root of the widget tree. Specifically, it should be above any Navigator widgets, including the navigator provided by the MaterialApp widget.
Now inside our MyApp widget, we can call the following function BetterFeedback.of(context).show to open the feedback modal. In the above example, we have added an ElevatedButton to execute the feedback function when pressed.
You can see that the whole application will become a dialog, this is exactly the reason why the BetterFeedback widget should be the root widget. Inside the feedback dialog, the user can navigate through the application, draw in the application, and add a description. In the following section, you will learn how to access this feedback.
Capture User Feedback
Inside the show function, you will have access to an instance of UserFeedback. When the user submits the feedback this instance will be created and available in the callback. See the below example, to learn how we can use it.
import 'package:feedback/feedback.dart';
import 'package:flutter/material.dart';

void main() => runApp(
      const BetterFeedback(
        child: MyApp(),
      ),
    );

class MyApp extends StatelessWidget {
  const MyApp({super.key});

  @override
  Widget build(BuildContext context) {
    return const MaterialApp(
      home: HomePage(),
    );
  }
}

class HomePage extends StatelessWidget {
  const HomePage({super.key});

  void _feedback(BuildContext context) {
    BetterFeedback.of(context).show((UserFeedback feedback) {
      showDialog(
        context: context,
        builder: (BuildContext context) => SimpleDialog(
          title: Column(
            children: [
              Text(feedback.text, style: const TextStyle(fontSize: 24)),
              const SizedBox(height: 10),
              Image.memory(feedback.screenshot, width: 250, height: 500),
            ],
          ),
        ),
      );
    });
  }

  @override
  Widget build(BuildContext context) {
    return Scaffold(
      body: Center(
        child: ElevatedButton(
          onPressed: () => _feedback(context),
          child: const Text('Give Feedback'),
        ),
      ),
    );
  }
}
In this example, we will open a dialog once the user submits the feedback. This dialog will show the message and the screenshot. Because we are opening a dialog we have to create a separate HomePage widget to ensure that it has access to the navigator of the MaterialApp.
Instead of calling the show function directly on the button we have created the _feedback function. The _feedback function calls the show function and after that opens a SimpleDialog. In this dialog, we will show the provided feedback using a Text widget that takes the feedback.text. We will also show the screenshot the user created, using the Image.memory widget that takes feedback.screenshot.
This will result in the following:
Of course, the goal of the feedback is not to be shown to the user, but we as developers would like to get it. One way of retrieving user feedback in Flutter is by allowing the user to email it to us. This is a convenient approach when you do not have a database.
Send User Feedback via Email in Flutter
To allow users to send their feedback by email, we need access to their email client. A great way to do this is by using the Flutter Email Sender package. Other than that we also need to temporarily save the screenshot on the user’s device. We can do this by using the Path Provider package.
Install the Flutter Email Sender Package
To install both packages we can execute the following command inside our project:
flutter pub add flutter_email_sender && flutter pub add path_providerAfter executing this command you should at least have the following packages in your dependencies:
dependencies:
  feedback: ^3.1.0
  flutter_email_sender: ^6.0.3
  path_provider: ^2.1.3
We also need to add the following intent to allow our application to send emails. This can be done inside the android\app\src\main\AndroidManifest.xml file:
<queries>
    <intent>
        <action android:name="android.intent.action.SENDTO" />
        <data android:scheme="mailto" />
    </intent>
    ...
</queries>
After making those changes we can continue implementing both packages inside our project.
Send Emails with User Feedback
To send an email with user feedback in Flutter we will have to call the send function of the FlutterEmailSender inside the show function of the BetterFeedback widget. This way we can access the UserFeedback instance so we can provide the feedback description and screenshot. Let us go over the following implementation:
import 'dart:io';

import 'package:feedback/feedback.dart';
import 'package:flutter/material.dart';
import 'package:flutter/services.dart';
import 'package:flutter_email_sender/flutter_email_sender.dart';
import 'package:path_provider/path_provider.dart';

void main() => runApp(
      const BetterFeedback(
        child: MyApp(),
      ),
    );

class MyApp extends StatelessWidget {
  const MyApp({super.key});

  Future<String> _writeScreenshotToStorage(Uint8List screenshot) async {
    final directory = await getTemporaryDirectory();
    final filePath = '${directory.path}/feedback.png';
    final file = File(filePath);

    await file.writeAsBytes(screenshot);

    return filePath;
  }

  @override
  Widget build(BuildContext context) {
    return MaterialApp(
      home: Scaffold(
        body: Center(
          child: ElevatedButton(
            onPressed: () => BetterFeedback.of(context).show(
              (UserFeedback feedback) async => FlutterEmailSender.send(
                Email(
                  attachmentPaths: [
                    await _writeScreenshotToStorage(feedback.screenshot),
                  ],
                  body: feedback.text,
                  recipients: ['info@onlyflutter.com'],
                  subject: feedback.text.split(' ').take(7).toList().join(' '),
                ),
              ),
            ),
            child: const Text('Give Feedback'),
          ),
        ),
      ),
    );
  }
}
In the above code, we created a new function called _writeScreenshotToStorage to temporarily save the screenshot in the user’s storage. We need to do this so it can be used as an email attachment. Inside the callback of the show function of the BetterFeedback widget we call the send function of the FlutterEmailSender.
This function takes an Email instance. In this case, we added the following attributes to the Email instance, the attachmentPaths which takes our new function to save the screenshot. We set the body to our feedback description. We have added the recipients which will be the email of the developer and we have added the subject which will be the first 7 words of the feedback message.
When running the application it might be possible you run into the following error:
Execution failed for task ':app:checkDebugDuplicateClasses'.See the following article to resolve it: Execution failed for task ‘:app:checkDebugDuplicateClasses’
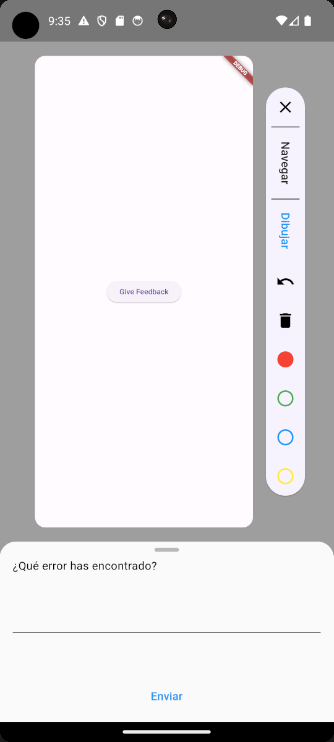
Change the Language of the Feedback Dialog
It is also possible to change the language of the feedback dialog. In the following example, we will change the default language to Spanish. Of course, you can also change it dynamically, but this will require more changes.
custom_feedback_localizations_delegate.dart
import 'package:feedback/feedback.dart';
import 'package:flutter/material.dart';

class _SpanishFeedbackLocalizations implements FeedbackLocalizations {
  @override
  String get draw => 'Dibujar';

  @override
  String get feedbackDescriptionText => '¿Qué error has encontrado?';

  @override
  String get navigate => 'Navegar';

  @override
  String get submitButtonText => 'Enviar';
}

class CustomFeedbackLocalizationsDelegate
    extends GlobalFeedbackLocalizationsDelegate {
  @override
  // ignore: overridden_fields
  final supportedLocales = <Locale, FeedbackLocalizations>{
    const Locale('es'): _SpanishFeedbackLocalizations(),
  };
}
Instead of adding everything in the main, we will create a new class called CustomFeedbackLocalizationsDelegate. In this class, we also have a private class called _SpanishFeedbackLocalizations. There we override 4 String getters with Spanish translations.
Aftward inside our CustomFeedbackLocalizationsDelegate class, we override the suppertedLocales. Inside the overridden, supportedLocales we can supply a map of type Locale and FeedbackLocalizations instances. In this case, we only supply the Spanish locale and our custom FeedbackLocalizations class.
main.dart
import 'package:user_feedback/custom_feedback_localizations_delegate.dart';


void main() => runApp(
      BetterFeedback(
        localeOverride: const Locale('es'),
        localizationsDelegates: [CustomFeedbackLocalizationsDelegate()],
        child: const MyApp(),
      ),
    );
To ensure that the Spanish translations are shown we also need to override the default Locale which is set to en_US by default to the Spanish locale. We also need to add the new class to the localizationDelegates attribute.
If you rebuild the application the feedback dialog should now be in Spanish.
Conclusion
In this post, you learned how simple it is to get user feedback in Flutter. The Feedback package can be implemented within seconds and is very convenient for the user. The user can easily access it within the application and can provide all the necessary information, like screenshots, drawings, and a description. You also know how to enable the user to send you feedback by email. And in case, your application is in a different language you know how to adapt the feedback dialog.


