Ads are a great way to monetize your application. Ads can be placed on the bottom of your application, inside lists, or even take up the whole page. Setting up ads for the first time might be a little tricky. Luckily there is a great package that simplifies adding ads using Google AdMob in Flutter. In this post, we will implement a banner ad together, to ensure you can monetize your application.
Table of contents
Requirements
To follow along you will need a Google AdMob account. AdMob is Google’s advertising platform for promoting and monetizing mobile applications. If you do not already have an AdMob account you can easily sign up on their website admob.google.
After you have signed up it is time to add your application to AdMob. Here are the necessary steps:
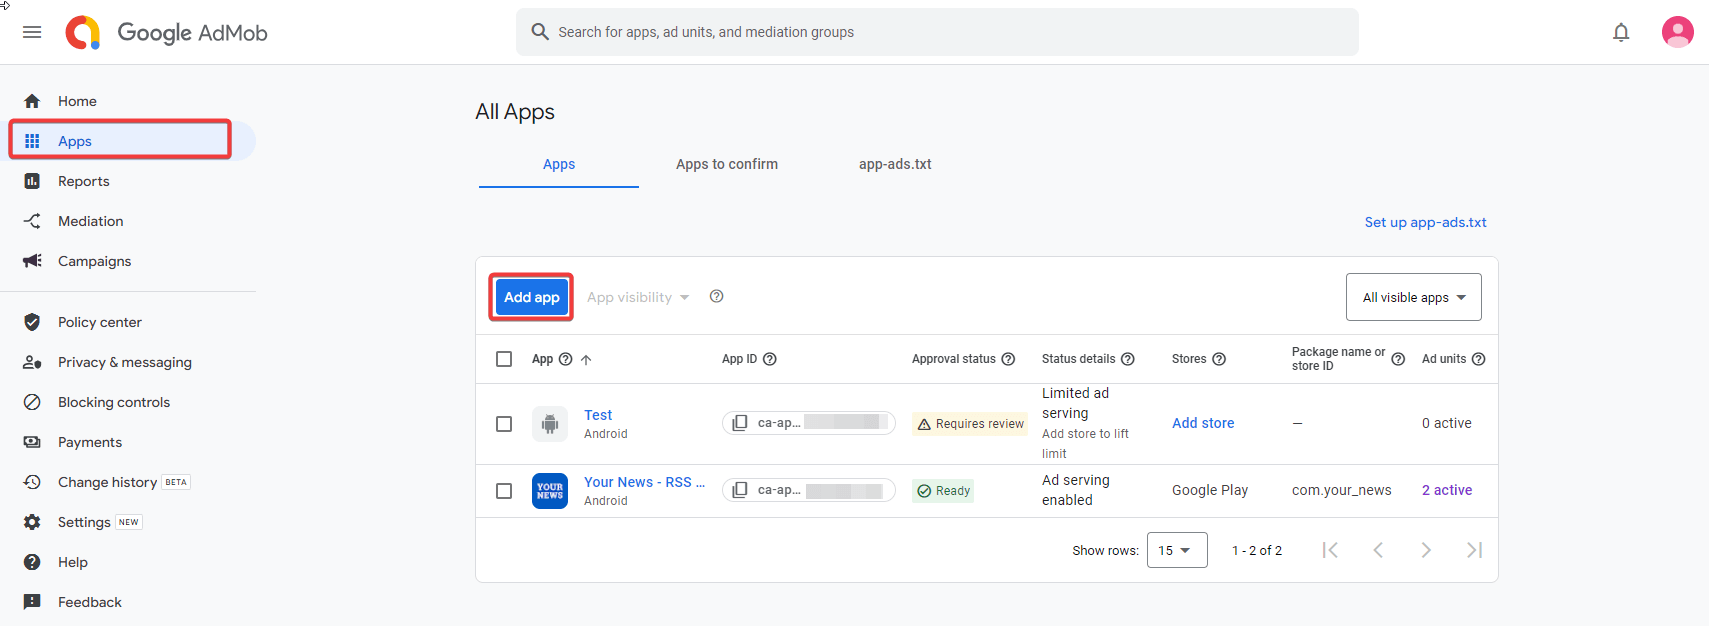
1. Navigate to the Apps section and click on Add app.
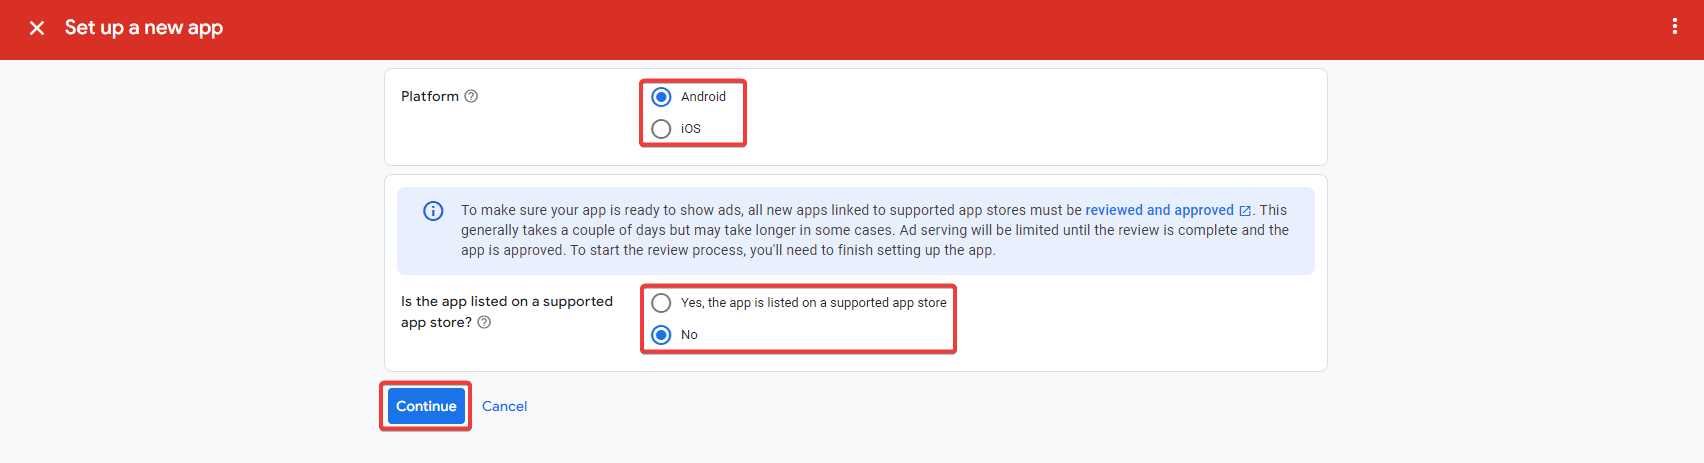
2. Choose the platform and let AdMob know if your application is listed on a supported app store.
3. Fill in the name of your application, keep in mind that the application name can be changed but the application itself can never be deleted.

After your application is created you can continue setting up Google Mobile Ads.
Getting Started with Google Mobile Ads
The most straightforward way to add ads to your Flutter application is using the Google Mobile Ads package. Google created this package to simplify the process of adding ads using AdMob.
1. Installing Google Mobile Ads
The installation process is simple. Just execute the following command inside your project to add the Google Mobile Ads package.
flutter pub add google_mobile_adsOnce the command is executed, check your pubspec.yaml file for the added dependencies. You should see the Google Mobile Ads package included in the dependencies section, like this:
dependencies:
  flutter:
    sdk: flutter
  google_mobile_ads: ^5.0.0
2. Adding the App ID from Google AdMob
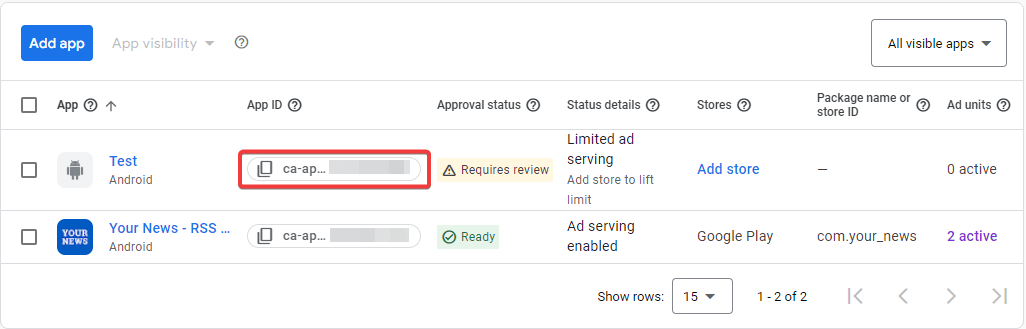
Now that we have installed the package. We have to connect our Flutter application with AdMob. This can be done by adding the App ID from AdMob to our application. The App ID can be found in AdMob’s Apps section and can easily be copied by clicking it. Make sure that you never share the App ID with anyone.
After we have copied the App ID we can add it inside our application. The implementation is different based on the platform. See them below:
For Android, we need to add a new meta-data entry inside the android/app/src/main/AndroidManifest.xml file. Ensure that the App ID is placed within the <application> tag and not inside the <activity> tag.
<application>
  ...
  <meta-data android:name="com.google.android.gms.ads.APPLICATION_ID"
             android:value="ca-app-pub-????????????????~??????????"
   />
</application>
Do not forget to replace the question marks in the value with your App ID.
For iOS, we need to add an entry inside the ios/Runner/Info.plist file. This can be done by adding a new key inside the <dict> tag. Replace the text in the <string> tag with your App ID.
<key>GADApplicationIdentifier</key>
<string>ca-app-pub-????????????????~??????????</string>
After those changes the application should be connected with AdMob.
3. Changing the minSdkVersion to 21
The Google Mobiles Ads package requires us to change the minSdkVersion to 21 or higher. Changing the minSdkVersion can be done inside the android\app\build.gradle file of our project.
defaultConfig {
    applicationId "com.example.ads_with_google_admob"
    minSdkVersion 21
    targetSdkVersion flutter.targetSdkVersion
    versionCode flutterVersionCode.toInteger()
    versionName flutterVersionName
}
Implementing Google’s AdBanner in Flutter
After installing the package and adding our App ID to the Flutter application it is now time to implement our first ad. In this post, we will be creating a banner ad. Banner ads are usually displayed at the bottom of the application.
The initial code of the project is very minimal, everything is written inside the main.dart file.
import 'package:flutter/material.dart';

void main() {
  runApp(const MyApp());
}

class MyApp extends StatefulWidget {
  const MyApp({super.key});

  @override
  State<MyApp> createState() => _MyAppState();
}

class _MyAppState extends State<MyApp> {
  @override
  Widget build(BuildContext context) {
    return MaterialApp(
      home: Scaffold(
        body: Column(
          children: [
            const Expanded(child: SizedBox.shrink()),
          ],
        ),
      ),
    );
  }
}
Because the banner ad will be displayed at the bottom we have a Column widget inside our Scaffold. Inside the Column widget, we have an Expanded widget which you could easily replace with the desired widget(s) of your choice. Right now it has a SizedBox.shrink() widget as a placeholder.
Adding the BannerAd
To add any ad using the Google Mobile Ads package we have to ensure that the MobileAds instance is initialized. You always want to do this at the startup of the application.
In the code below we start by importing the Google Mobile Ads package. Inside the main function we call WidgetsFlutterBinding.ensureInitialized(); followed by MobileAds.instance.initialize();. They have to be called in that order because before the MobileAds instance can be initialized we have to make sure that the WidgetsFlutterBinding is also initialized.
import 'package:flutter/material.dart';
import 'package:google_mobile_ads/google_mobile_ads.dart';

void main() {
  WidgetsFlutterBinding.ensureInitialized();
  MobileAds.instance.initialize();

  runApp(const MyApp());
}

class MyApp extends StatefulWidget {
  const MyApp({super.key});

  @override
  State<MyApp> createState() => _MyAppState();
}

class _MyAppState extends State<MyApp> {
  BannerAd? _bannerAd;

  @override
  void initState() {
    super.initState();
    _createBannerAd();
  }

  Future<void> _createBannerAd() async {
    _bannerAd = BannerAd(
      adUnitId: 'ca-app-pub-3940256099942544/6300978111',
      size: AdSize.banner,
      request: const AdRequest(),
      listener: BannerAdListener(
        onAdLoaded: (Ad ad) {},
        onAdFailedToLoad: (Ad advertisement, LoadAdError error) =>
            advertisement.dispose(),
      ),
    )..load();
  }

  @override
  Widget build(BuildContext context) {
    return MaterialApp(
      home: Scaffold(
        body: Column(
          children: [
            const Expanded(child: SizedBox.shrink()),
            if (_bannerAd != null)
              Center(
                child: SizedBox(
                  width: _bannerAd?.size.width.toDouble(),
                  height: _bannerAd?.size.height.toDouble(),
                  child: AdWidget(ad: _bannerAd!),
                ),
              ),
          ],
        ),
      ),
    );
  }
}
After initializing we are ready to use the BannerAd. Every ad from the Google Mobile Ads package can be displayed using the AdWidget. However, we need to guarantee that the ad is loaded before we add it to the AdWidget.
For this reason, we use the initState function that calls the _createBannerAd function. Inside the _createBannerAd function, we assign a new BannerAd instance to our _bannerAd variable.
The BannerAd Class
The BannerAd takes an adUnitId which in this example is set to the dedicated test ad unit ID for Android. But this ID can also be replaced with the dedicated test ad unit ID for iOS.
Every ad of the Google Mobile Ads SDK has a dedicated test unit. You can see the dedicated banner test ad unit IDs for Android and iOS below:
Android
ca-app-pub-3940256099942544/6300978111iOS
ca-app-pub-3940256099942544/2934735716Furthermore, the size of the ad is defined using AdSize.banner. We have the request and a listener which can be used to perform actions whenever an ad is loaded successfully or not.
At last, we call the load() function using the cascade notation (..), which allows us to call the function on the object without having to create a separate variable for it.
Now with the BannerAd being successfully loaded we still have to add it to our AdWidget. This is done on line 52. You can see that we also use an if statement to only show the AdWidget when the _bannerAd variable is not null.
Running the above code will result in the following:
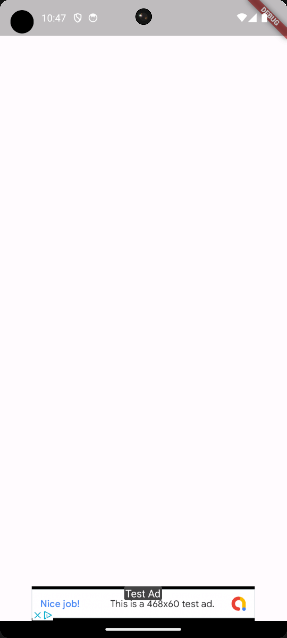
As you can see we have successfully loaded our first banner ad. However, we are not quite satisfied yet, because the banner ad is not using the full width of our screen.
Requesting the AdBanner Size
To ensure that our banner ad takes up the full width we can request the size using the getCurrentOrientationAnchoredAdaptiveBannerAdSize function. This function returns the ad size with the given width and a Google-optimized height to create a BannerAd.
import 'package:flutter/material.dart';
import 'package:google_mobile_ads/google_mobile_ads.dart';

void main() {
  WidgetsFlutterBinding.ensureInitialized();
  MobileAds.instance.initialize();

  runApp(const MyApp());
}

class MyApp extends StatefulWidget {
  const MyApp({super.key});

  @override
  State<MyApp> createState() => _MyAppState();
}

class _MyAppState extends State<MyApp> {
  BannerAd? _bannerAd;

  @override
  void didChangeDependencies() {
    super.didChangeDependencies();
    _createBannerAd();
  }

  Future<void> _createBannerAd() async {
    await AdSize.getCurrentOrientationAnchoredAdaptiveBannerAdSize(
      MediaQuery.sizeOf(context).width.truncate(),
    ).then((AnchoredAdaptiveBannerAdSize? size) => _bannerAd = BannerAd(
          adUnitId: 'ca-app-pub-3940256099942544/6300978111',
          size: size ?? AdSize.banner,
          request: const AdRequest(),
          listener: BannerAdListener(
            onAdLoaded: (Ad ad) {},
            onAdFailedToLoad: (Ad advertisement, LoadAdError error) =>
                advertisement.dispose(),
          ),
        )..load());
  }

  @override
  Widget build(BuildContext context) {
    return MaterialApp(
      home: Scaffold(
        body: Column(
          children: [
            const Expanded(child: SizedBox.shrink()),
            if (_bannerAd != null)
              Center(
                child: SizedBox(
                  width: _bannerAd?.size.width.toDouble(),
                  height: _bannerAd?.size.height.toDouble(),
                  child: AdWidget(ad: _bannerAd!),
                ),
              ),
          ],
        ),
      ),
    );
  }
}
We have to call the getCurrentOrientationAnchoredAdaptiveBannerAdSize function before we create and load our BannerAd. Therefore we await the function and use a then callback to assign our BannerAd to the _bannerAd variable. Notice that the size returned from the function is nullable. For that reason, we still want to have AdSize.banner as our fallback.
We also have to change the initState function with the didChangeDependencies function to avoid running into build issues.
With those changes applied, we will get the following banner ad:
This looks much better and we can now move on to the final step, which is displaying real banner ads.
Creating a New Ad Unit to Show Ads with Google AdMob
So far we have been using the dedicated test ad units to display ads with Google AdMob. However, we want to use our own ad unit ID. Therefore we have to create a new ad unit in AdMob.
1. Creating a Banner Ad Unit in AdMob
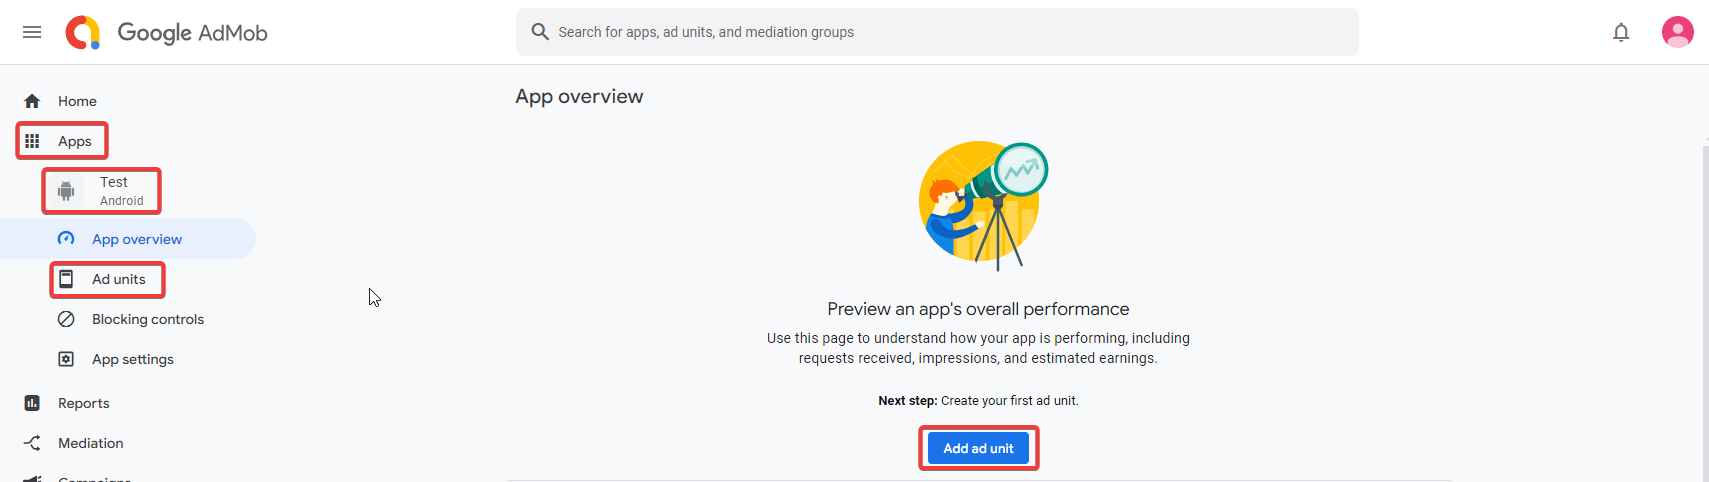
1. In the Apps section of AdMob we have to select our application, and either click on the Add ad unit button or go to the Ad units section.
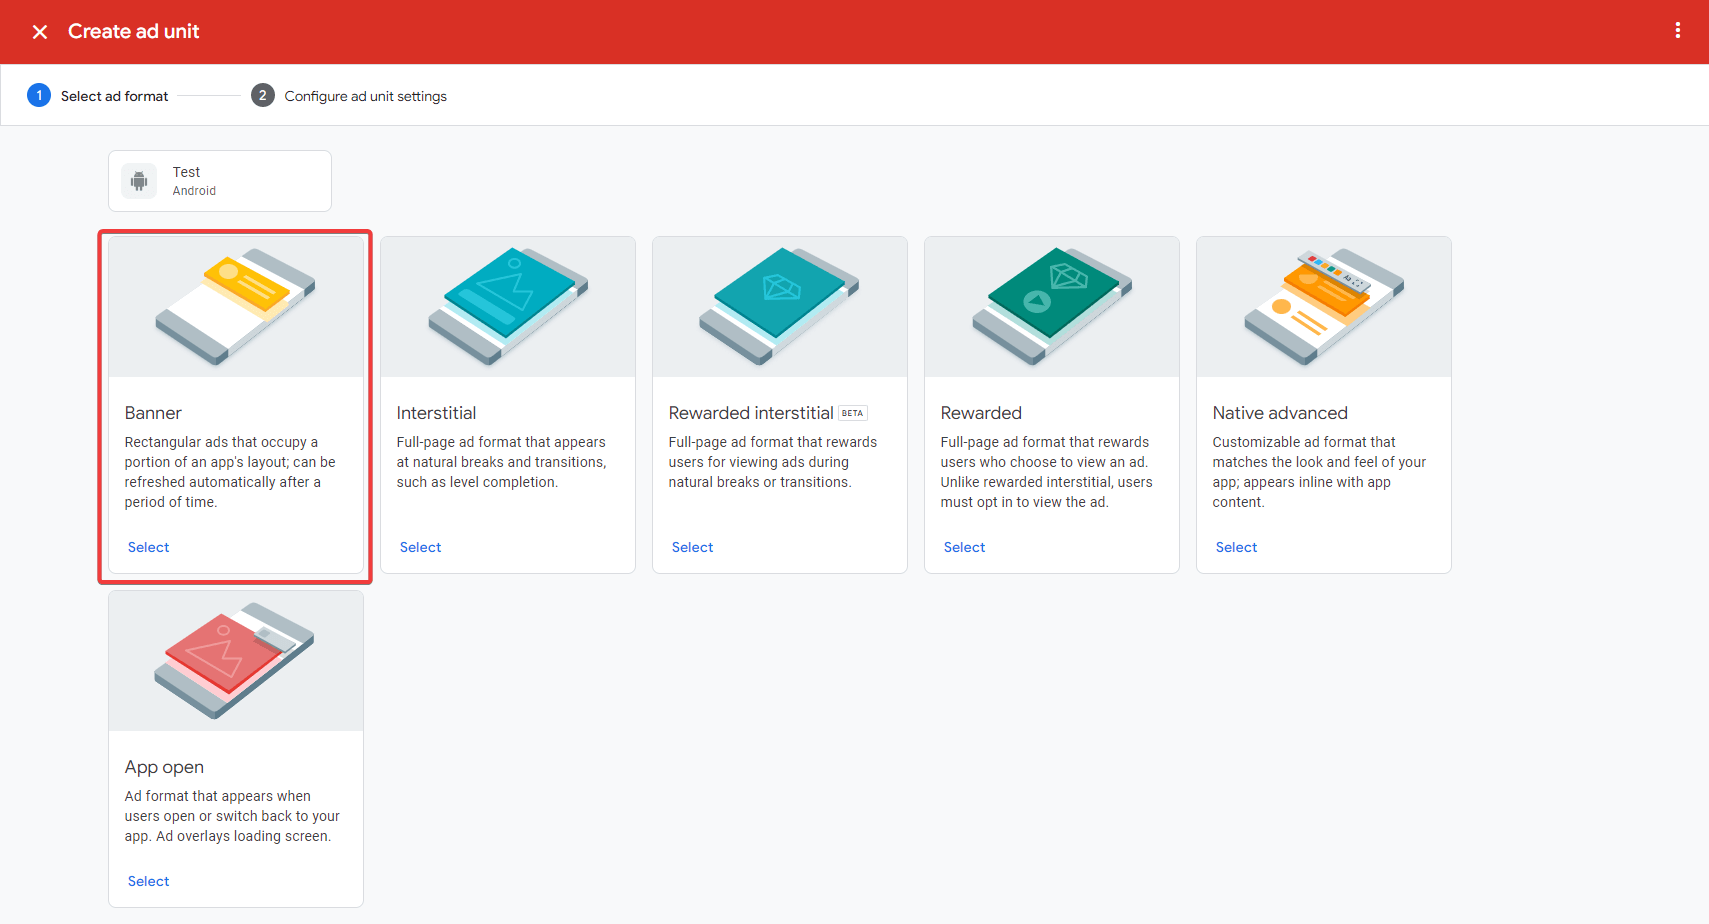
2. Once we have clicked the button we have to select an ad format, which will be the Banner in our case.
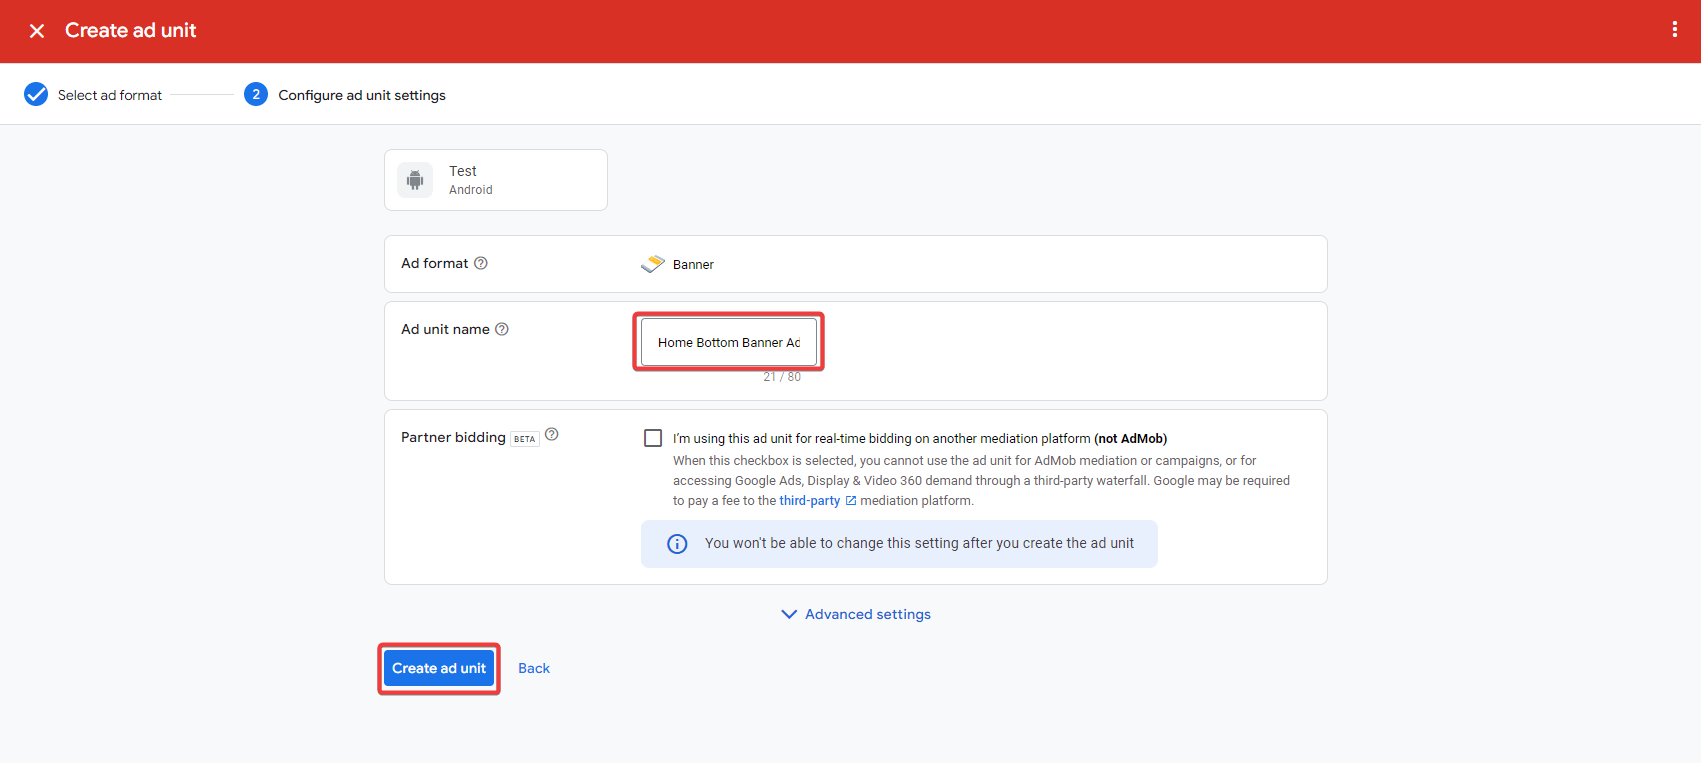
3. After selecting our format, we have to name our banner ad, make sure you choose a descriptive name to make it easy to find. You can have a look at the Advanced settings, however, they can always be changed later. Click on Create ad unit to finish the creation.
4. Now that our ad unit is created you can copy the second ID that is given. The first given ID is the App ID, which we already added to our application.
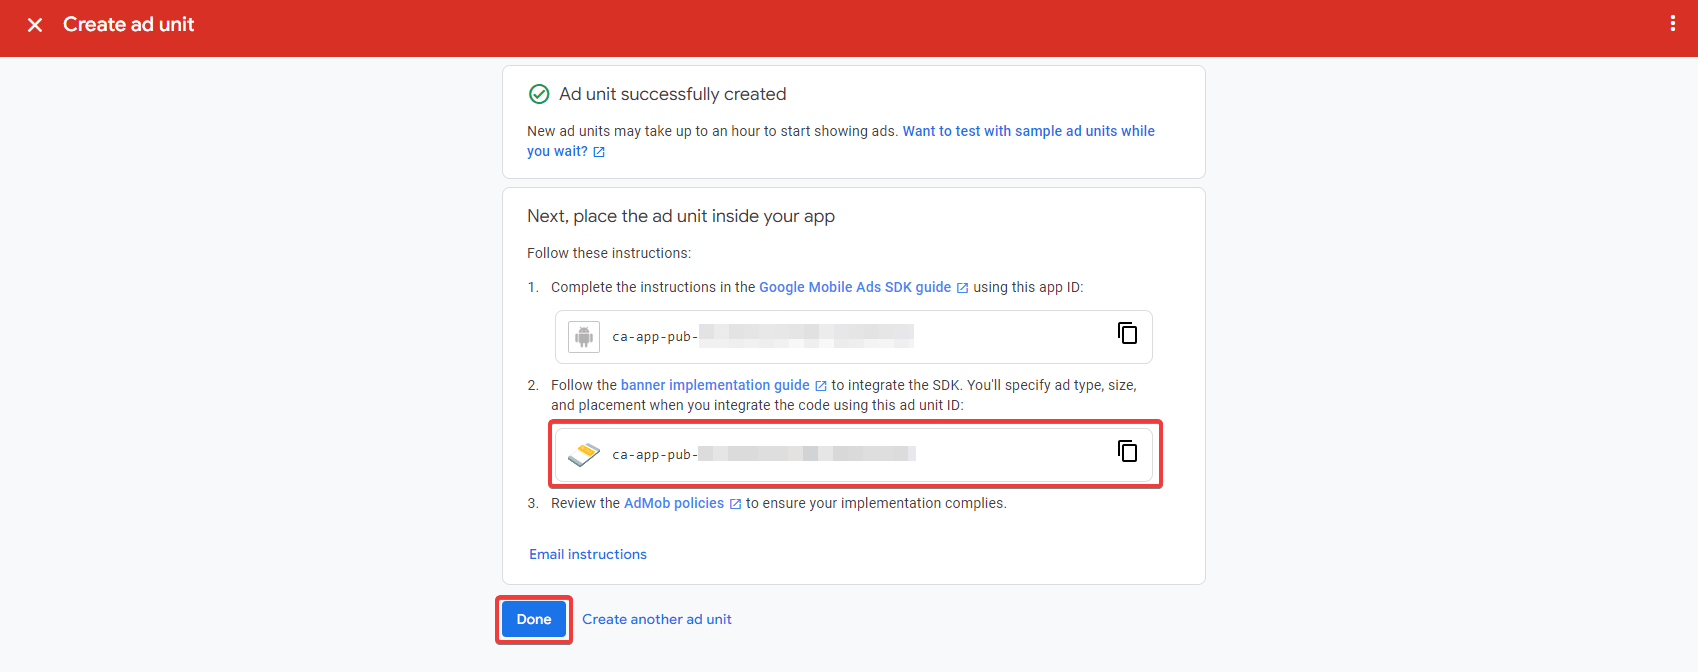
Keep in mind that it might take some time before your ad unit is ready to use. AdMob mentions that it can take up to an hour.
2. Getting the Ad Test ID from AdMob
Before we add the ad unit ID to our application we have to get our Advertising ID. Every device has an Advertising ID. In our case, this ID is used to help AdMob recognize the device as a testing device. This will help you to prevent running into issues with AdMob. Of course, they do not want you to run actual ads when developing. I recommend always getting the Advertisement ID of your actual phone and all the Advertisement IDs of your testing devices.
The GIF below demonstrates how to get the Advertising ID on an Android emulator. This is for demonstration purposes because every emulator is automatically recognized as a testing device.
The steps taken in the GIF are:
- Go to settings.
- Search for “ads”.
- Click Ads.
- Click Ads again.
- The Advertisement ID is displayed in the middle of your screen.
Of course, this will be different for other platforms and devices.
3. Using the Banner Ad Unit in our Application
In our main function we want to update our request configuration using the updateRequestConfiguration function. This function takes a RequestConfiguration and inside this configuration, we can add an array of Advertisement IDs.
import 'package:flutter/material.dart';
import 'package:google_mobile_ads/google_mobile_ads.dart';
Future<void> main() async {
WidgetsFlutterBinding.ensureInitialized();
MobileAds.instance.initialize();
await MobileAds.instance.updateRequestConfiguration(
RequestConfiguration(
testDeviceIds: [
'2793ca2a-5956-45a2-96c0-16fafddc1a15',
],
),
);
runApp(const MyApp());
}
class MyApp extends StatefulWidget {
const MyApp({super.key});
@override
State<MyApp> createState() => _MyAppState();
}
class _MyAppState extends State<MyApp> {
BannerAd? _bannerAd;
@override
void didChangeDependencies() {
super.didChangeDependencies();
_createBannerAd();
}
Future<void> _createBannerAd() async {
await AdSize.getCurrentOrientationAnchoredAdaptiveBannerAdSize(
MediaQuery.sizeOf(context).width.truncate(),
).then((AnchoredAdaptiveBannerAdSize? size) => _bannerAd = BannerAd(
adUnitId: 'ca-app-pub-????????????????/??????????',
size: size ?? AdSize.banner,
request: const AdRequest(),
listener: BannerAdListener(
onAdLoaded: (Ad ad) {},
onAdFailedToLoad: (Ad advertisement, LoadAdError error) =>
advertisement.dispose(),
),
)..load());
}
@override
Widget build(BuildContext context) {
return MaterialApp(
home: Scaffold(
body: Column(
children: [
const Expanded(child: SizedBox.shrink()),
if (_bannerAd != null)
Center(
child: SizedBox(
width: _bannerAd?.size.width.toDouble(),
height: _bannerAd?.size.height.toDouble(),
child: AdWidget(ad: _bannerAd!),
),
),
],
),
),
);
}
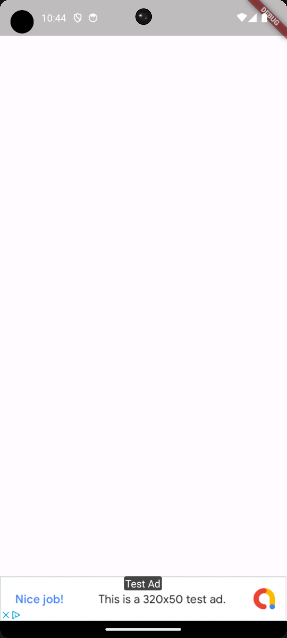
}To add our new ad unit ID we have to replace the dedicated ad unit ID with the one we have created. I have hidden mine because those IDs should not be shared. Once you have made the change you should see an ad like the one below:

Make sure that “Test Ad” is mentioned on your testing devices. Otherwise, you did not add the correct Advertising ID to the testDeviceIds array. On all other devices, it will display actual ads.
Adding Google AdMob Consent Messages
In some cases, it is necessary to ask users for consent to show personalized ads. Luckily this can also easily be achieved with Google AdMob. Check out the following article: Flutter Consent Messages with Google Admob
Conclusion
In this post, we have successfully implemented ads with Google AdMob by displaying a banner ad using the Google Mobile Ads package. You have learned how to connect Google AdMob with your Flutter application. At the same time, you have also created your first ad unit and used it to display an actual ad. Remember, that you can always use Google’s dedicated ad units for testing.


