Unit Testing is an essential part of any software development process that helps ensure the reliability of your code. In Flutter, unit testing plays an important role in verifying the functionality of individual units of code, such as functions or methods. By writing unit tests, you can catch bugs early, improve code quality, and increase the overall stability of your application.
In this post, we will create several unit tests in Flutter together. We will walk through the setup, write and run unit tests, and review best practices.
Table of contents
Setting up the Project
We will start by setting up our main.dart file. In this file, we define our MyApp widget, which extends a StatelessWidget. The MyApp widget sets up our MaterialApp with the AuthenticationPage widget as the home page, see the code below:
import 'package:flutter/material.dart';

void main() => runApp(const MyApp());

class MyApp extends StatelessWidget {
  const MyApp({super.key});

  @override
  Widget build(BuildContext context) {
    return const MaterialApp(
      title: 'Unit test demo',
      home: AuthenticationPage(),
    );
  }
}

class AuthenticationPage extends StatelessWidget {
  const AuthenticationPage({super.key});

  String? validate({required String? value, required String field}) {
    if (value!.isEmpty) {
      return 'This field cannot be empty.';
    }

    if (field == 'email' &&
        RegExp(r'^[\w-\.]+@([\w-]+\.)+[\w-]{2,4}$').hasMatch(value) == false) {
      return 'This is not a valid email address.';
    }

    if (field == 'password' && value.length < 6) {
      return 'The password must be at least 6 characters.';
    }

    return null;
  }

  @override
  Widget build(BuildContext context) {
    return const Scaffold();
  }
}
The AuthenticationPage widget contains a validate function responsible for validating input values for email and password fields. The function checks for empty fields, validates email addresses using a regular expression, and ensures that the password has a minimum length of six characters.
Writing Unit Tests in Flutter
Let us start by creating our test file. A good start is to create a unit directory inside your test directory. Inside the unit directory, we want to create our test file. We take the name of our function validate and suffix it with _test.dart to create a file with the following name validate_test.dart.
|-- test/
  |-- unit/
    |-- validate_test.dart
Inside our test file, we will start with the main function. Inside the main function, we will write our tests. For unit tests, we use the test function. Inside the test function, we provide the name of the test as the first parameter and a callback in the second parameter. To access the test function we need to import flutter_test.dart, as shown in the code below:
import 'package:flutter_test/flutter_test.dart';

void main() {
  test('it returns an error message when email field is empty', () {

  });
}
Usually
flutter_testis pre-installed, if this is not the case install it by executing the following command:flutter pub add flutter_test --dev.
As the name of the test suggests we want to ensure that it will return an error message when the email field is empty.
So for this, we need to call the validate function with an empty value , and the email. But first, how are we going to call this function? We have to call this function from the AuthenticationPage widget so let us create an instance.
import 'package:flutter_test/flutter_test.dart';
import 'package:flutter_unit_testing/main.dart';

void main() {
  const authenticationPage = AuthenticationPage();

  test('it returns an error message when email field is empty', () {

  });
}
We put the authenticationPage variable above the test because we want to reuse it in other tests.
Email Field Unit Tests
Now that we have our instance of the AuthenticationPage let us call the validate function inside the test and make sure that we get the expected output:
import 'package:flutter_test/flutter_test.dart';
import 'package:flutter_unit_testing/main.dart';
void main() {
const authenticationPage = AuthenticationPage();
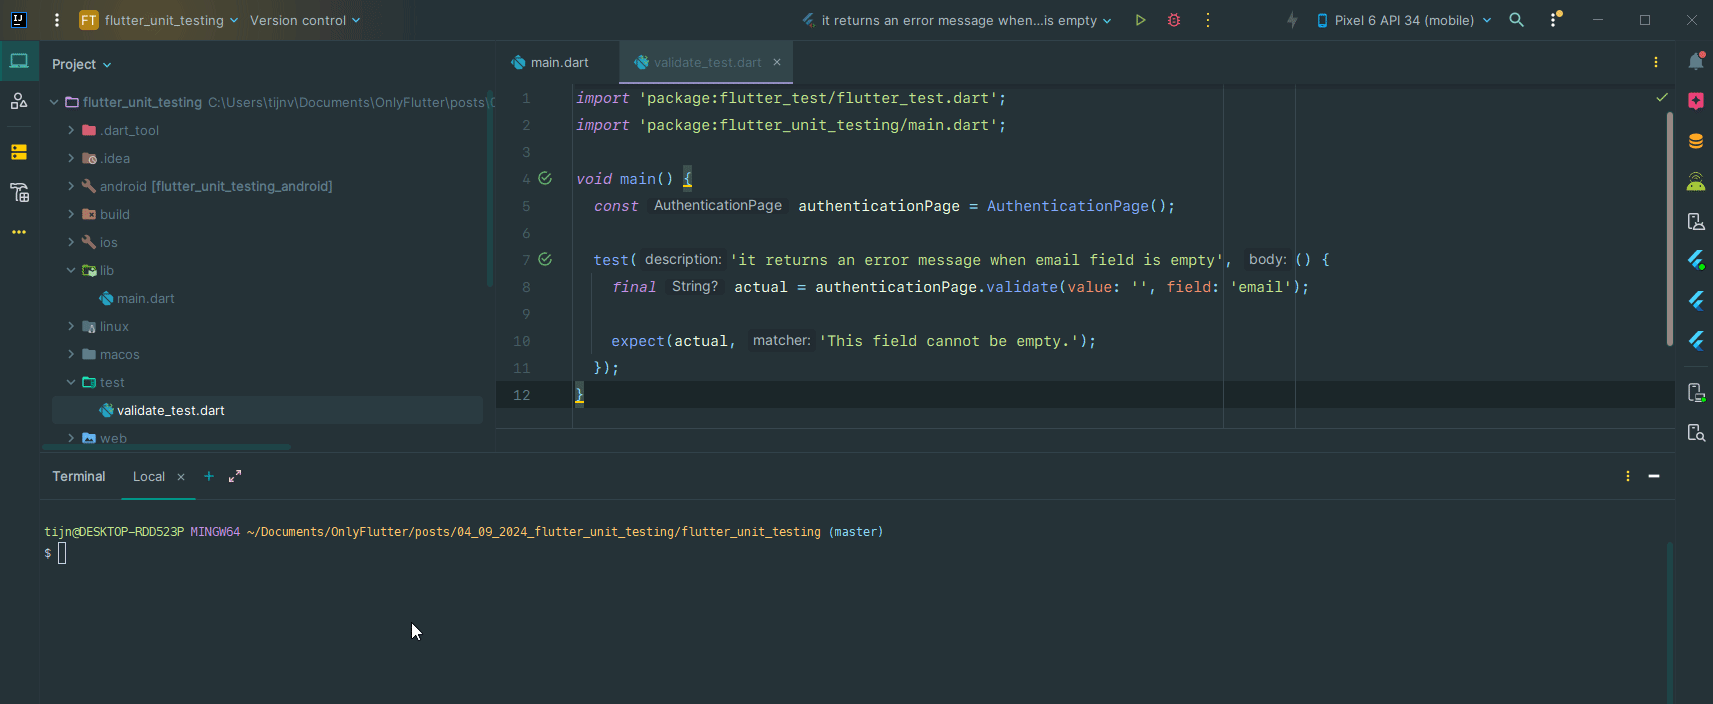
test('it returns an error message when email field is empty', () {
final actual = authenticationPage.validate(value: '', field: 'email');
expect(actual, 'This field cannot be empty.');
});
}In this code snippet, we are calling the validate function with an empty value and the email field on line 8. On line 10 we are using the expect function from the flutter_test package to assert if our actual output matches what we expect. In this case, we expect the “this field cannot be empty” error message.
With this, we finished our first test. You can run the test in multiple ways:
1. You can execute the following command using your CLI to run all tests:
flutter testEnsure that you are inside your project when you execute the above command.
2. If you are using an IDE like IntelliJ or VSCode you can use the built-in buttons to run tests as shown in the GIF below:
The built-in buttons will only show when you have the Flutter plugin installed.
3. It is also possible to run a single test from the CLI by executing the following command:
flutter test --plain-name="it returns an error message when email field is empty"As you can see after the --plain-name flag you need to add the name of the test in double quotes "".
After writing our first email test, let us continue with the other tests, see the code below:
import 'package:flutter_test/flutter_test.dart';
import 'package:flutter_unit_testing/main.dart';
void main() {
const authenticationPage = AuthenticationPage();
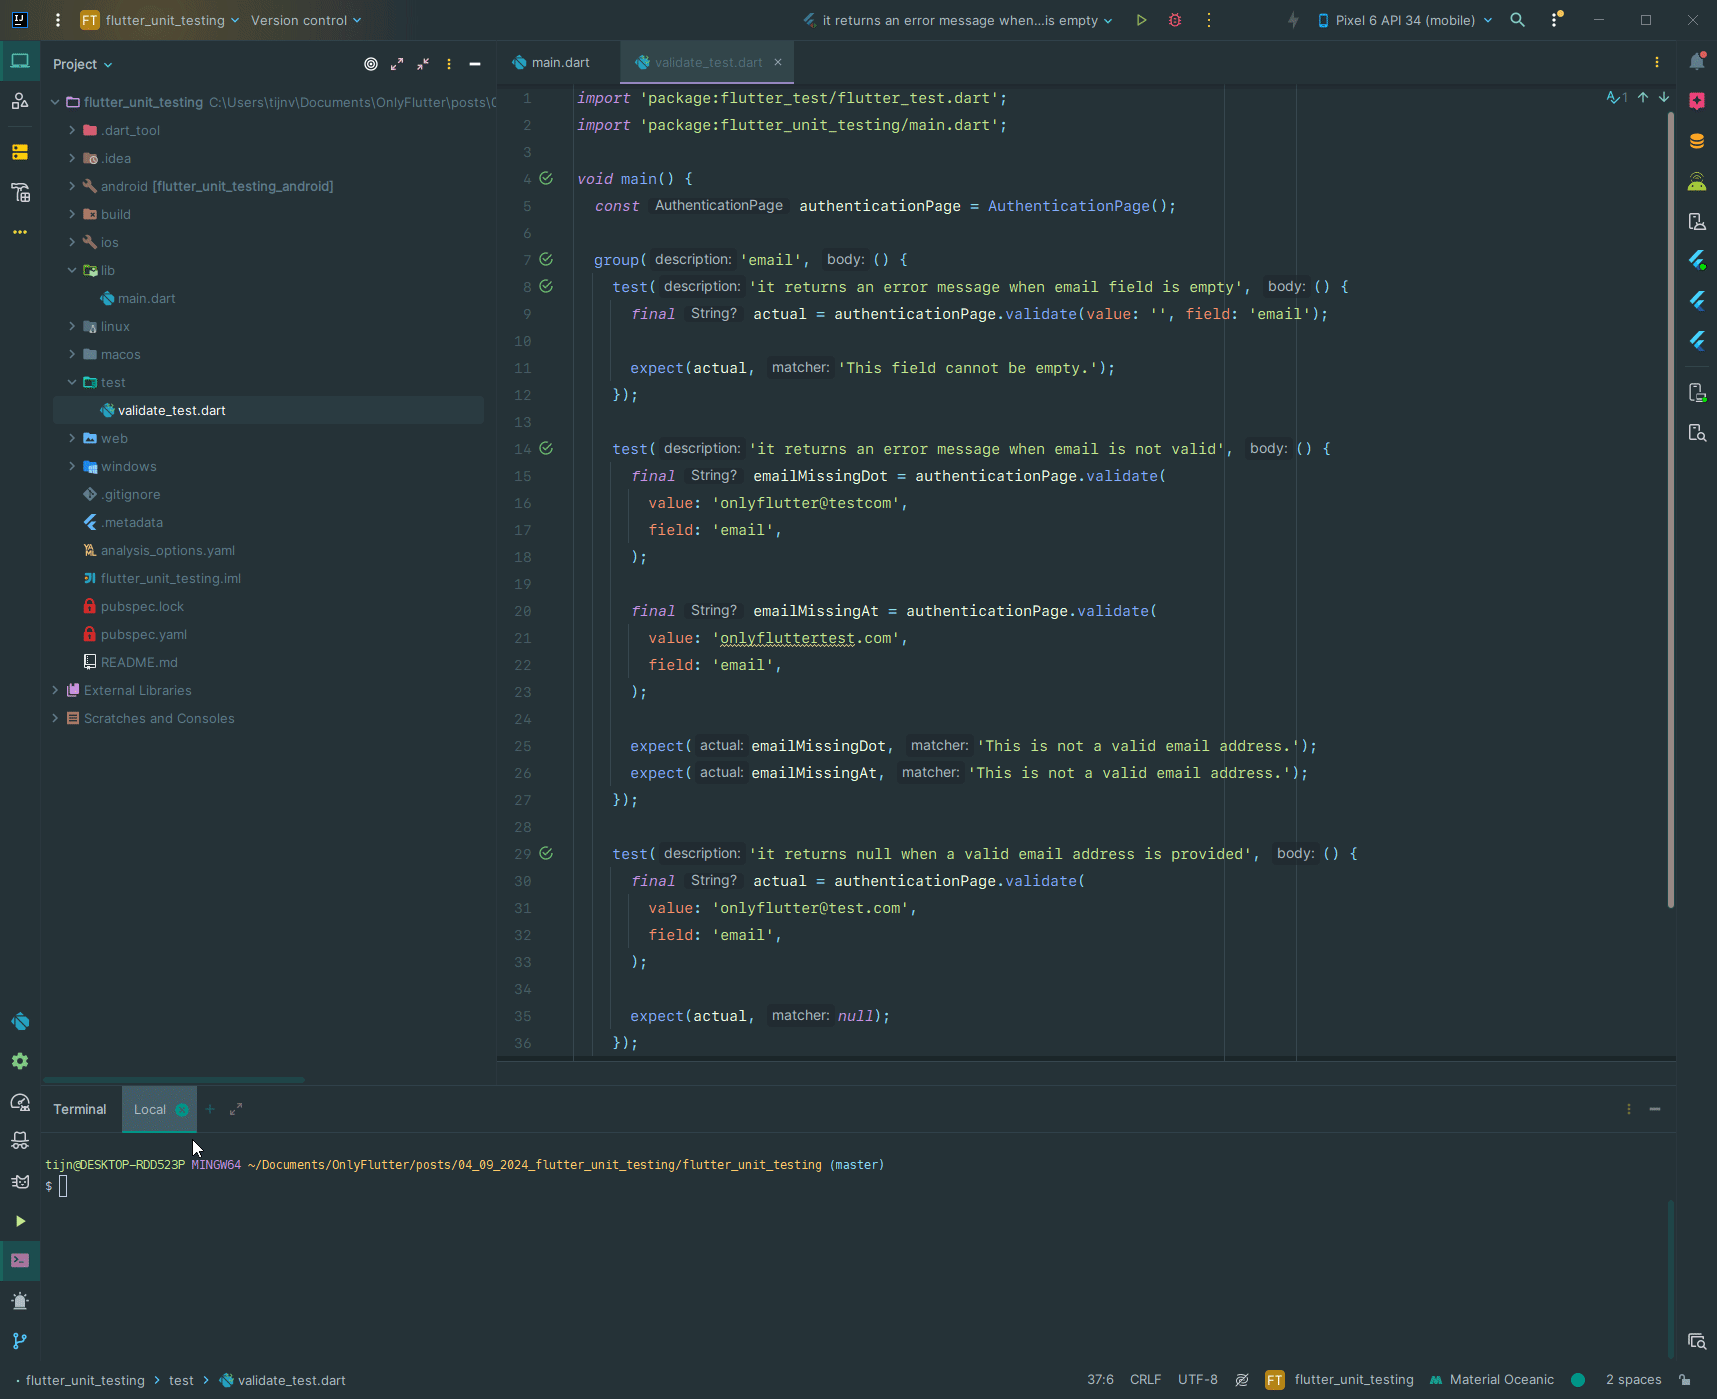
group('email', () {
test('it returns an error message when email field is empty', () {
final actual = authenticationPage.validate(value: '', field: 'email');
expect(actual, 'This field cannot be empty.');
});
test('it returns an error message when email is not valid', () {
final emailMissingDot = authenticationPage.validate(
value: 'onlyflutter@testcom',
field: 'email',
);
final emailMissingAt = authenticationPage.validate(
value: 'onlyfluttertest.com',
field: 'email',
);
expect(emailMissingDot, 'This is not a valid email address.');
expect(emailMissingAt, 'This is not a valid email address.');
});
test('it returns null when a valid email address is provided', () {
final actual = authenticationPage.validate(
value: 'onlyflutter@test.com',
field: 'email',
);
expect(actual, null);
});
});
}In the above code snippet, we added the additional tests for the email field. As you can see the approach is similar to our first test, the only difference is that we provide different parameters in the validate function. For this reason, we also have different expectations. Also, you might have noticed that in the second test, we have two expectations in one test. This is perfectly fine and you can add as many in a single test as you need.
We also wrapped all our tests in the group function and named it “email”. Grouping tests allow us to run the group as a whole using the --plain-name flag.
flutter test --plain-name="email"As demonstrated in the GIF below:
After writing some tests for the email field let us move on to the password field.
Password Field Unit Tests
The tests for the password field are similar to those from the email, however in the group function, we will create a function to avoid code duplication, see the code below:
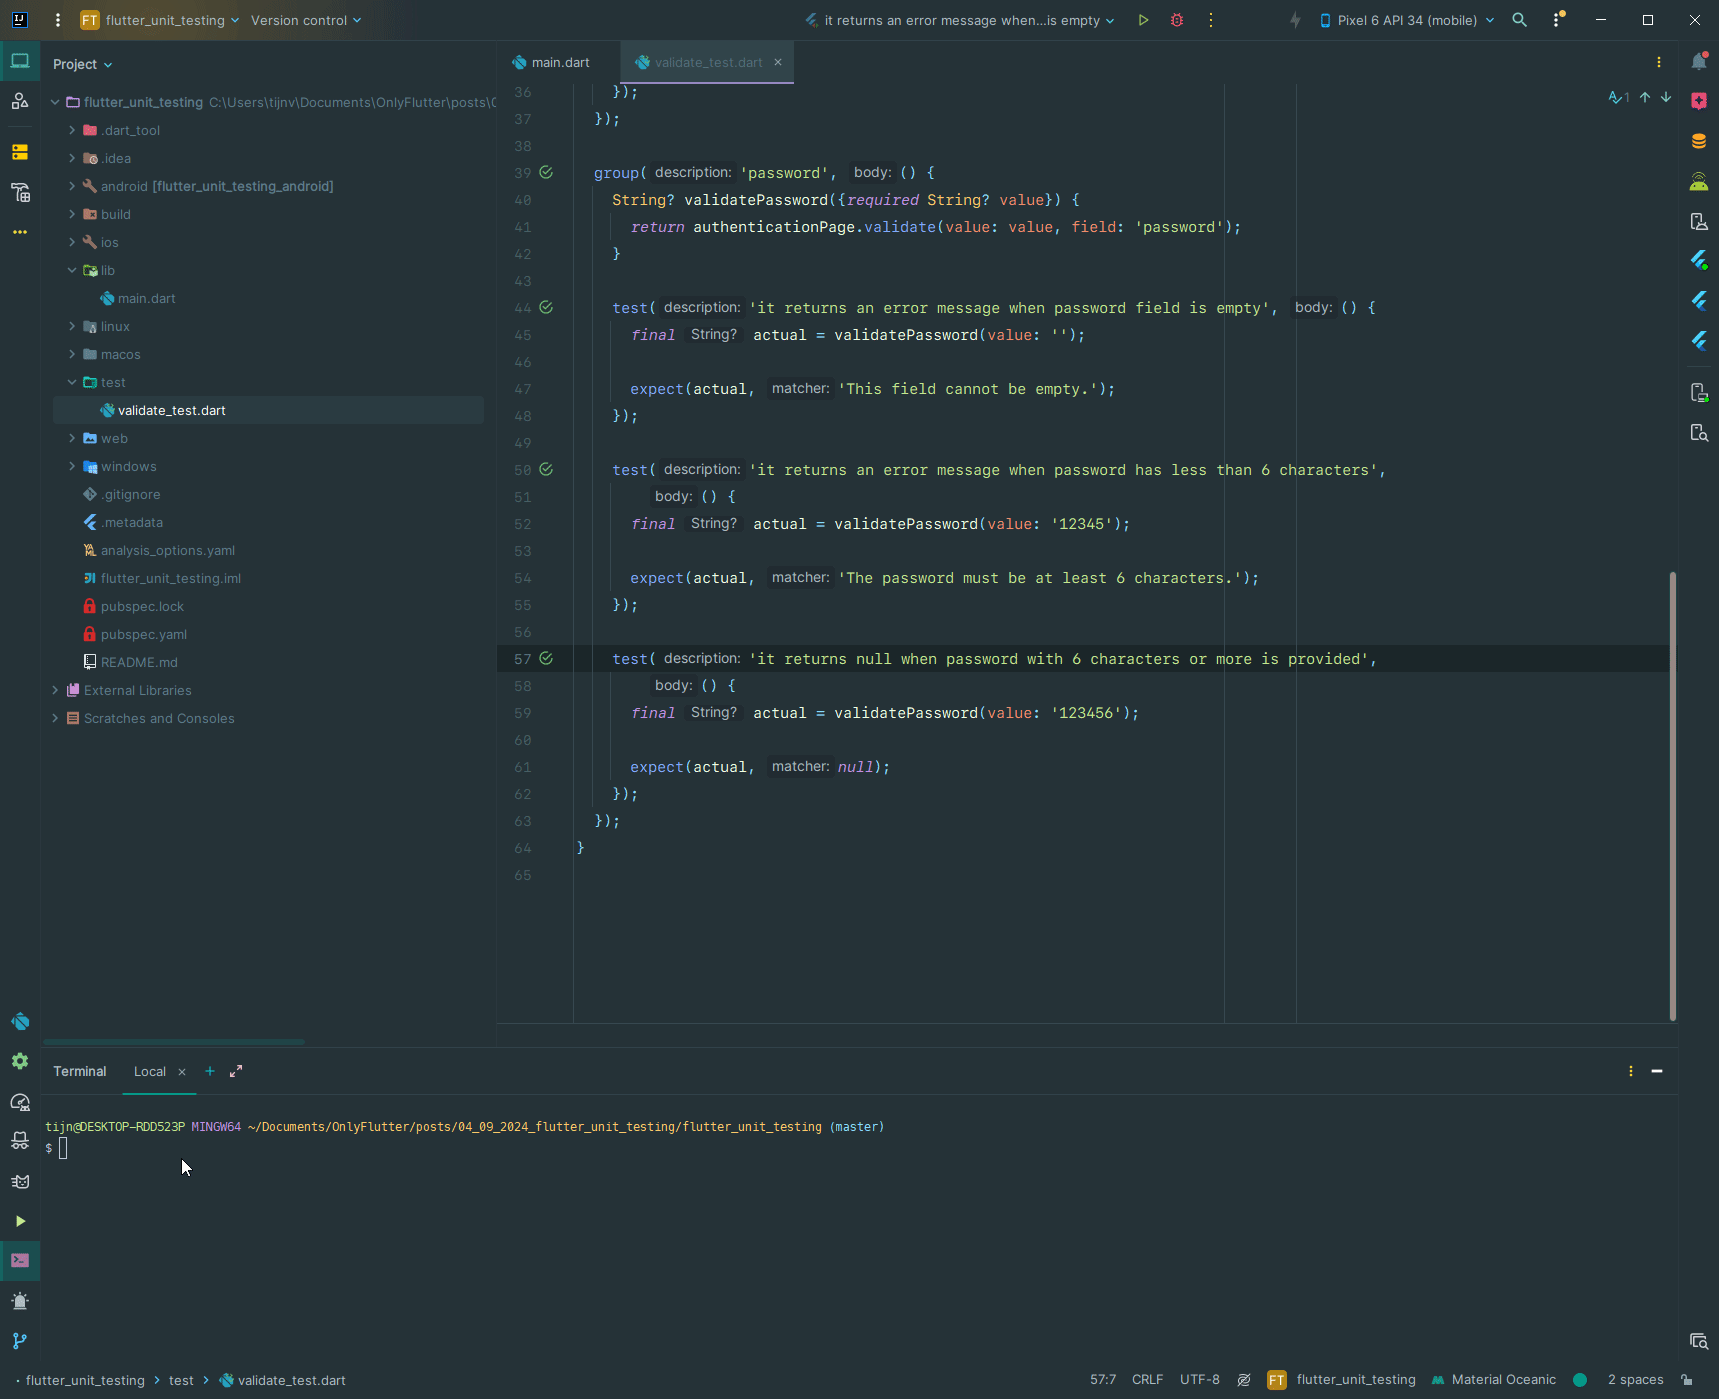
group('password', () {
  String? validatePassword({required String? value}) {
    return authenticationPage.validate(value: value, field: 'password');
  }

  test('it returns an error message when password field is empty', () {
    final actual = validatePassword(value: '');

    expect(actual, 'This field cannot be empty.');
  });

  test('it returns an error message when password has less than 6 characters',
      () {
    final actual = validatePassword(value: '12345');

    expect(actual, 'The password must be at least 6 characters.');
  });

  test('it returns null when password with 6 characters or more is provided',
      () {
    final actual = validatePassword(value: '123456');

    expect(actual, null);
  });
});
In this code snippet, we have added the validatePassword function in the group function. Because inside the password group, we will always be setting the field parameter of the validate function to password. By doing this we simplify our code by using a function that already sets the field to password for us. This is another benefit of grouping tests. The same can be done for the email field.
Now when we run all our tests using flutter test you will see that all our tests succeed.
With that, we successfully tested the validate function of our AuthenticationPage widget.
When to Write Unit Tests?
Knowing when to write unit tests in Flutter is crucial for maintaining a balance between development speed and code quality. Here are some key scenarios where writing unit tests is highly recommended:
- New features or functionalities: When adding new features or functionalities to your application, it is a good practice to write unit tests alongside the implementation. This helps ensure that the new code behaves as expected and does not break existing functionality.
- Bug fixes: Whenever you encounter a bug in your application, it is essential to write a unit test that reproduces the issue. This not only helps in identifying the root cause of the bug but also makes sure the fix does not break any existing functionality.
- Code refactoring: During code refactoring, when you change or optimize existing code without changing its behavior, unit tests act as a safety net. They ensure that the refactored code still functions as intended.
- Complex logic or critical components: Unit tests can be very valuable for complex logic or critical components of your application. By testing these parts, you can ensure that they work as intended and handle all the edge cases.
Conclusion
In this post, we have written multiple unit tests, for the validate function. We started by setting up the main.dart file and defining the AuthenticationPage widget. Then, we started to write unit tests using the flutter_test package. We wrote tests to ensure that the function handles empty, email, and password fields correctly.
Remember, unit tests are not a one-time effort but an ongoing process. Maintaining and updating your tests as your codebase grows is important for long-term success. By investing time in writing unit tests, you can ensure the reliability, maintainability, and stability of your Flutter applications.


