Scanning QR codes is very common nowadays, it allows for quick data exchange through mobile devices. As a Flutter developer, you may want to add QR code scanning to your application. Thanks to the Mobile Scanner package it is easy to scan QR codes in Flutter.
Table of contents
Configure the Project to Enable QR Code Scanning
Before we can start scanning QR codes in Flutter, we first need to install the Mobile Scanner package. After that, we have to upgrade the MinSdkVersion for Android and add permissions to the Info.plist file for iOS.
Install the Mobile Scanner Package
As mentioned above, we need to install the Mobile Scanner package into our project. The package can be installed easily by executing the following command:
flutter pub add mobile_scannerOnce the command is executed, make sure to check your pubspec.yaml file for the added dependencies. You should see the Mobile Scanner package included in the dependencies like this.
dependencies:
  mobile_scanner: ^5.1.1
Changing the MinSdkVersion for Android
Whether you are following this tutorial inside your existing project or have created a new project to follow along, you need to upgrade your MinSdkVersion to 21. If you do not, you will encounter the error below when starting your application on Android.
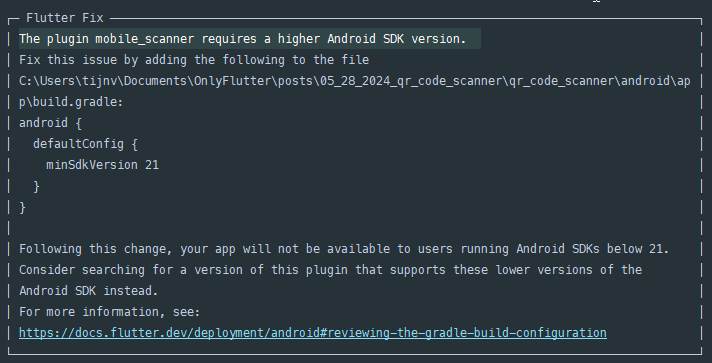
As shown in the message the Mobile Scanner package requires a minSdkVersion of 21. To change the minSdkVersion we need to make some changes to the android/app/build.gradle file.
Inside this file, you will find the defaultConfig. In a fresh project, it should look like this:
defaultConfig {
    // TODO: Specify your own unique Application ID (https://developer.android.com/studio/build/application-id.html).
    applicationId "com.example.qr_code_scanner"
    // You can update the following values to match your application needs.
    // For more information, see: https://docs.flutter.dev/deployment/android#reviewing-the-gradle-build-configuration.
    minSdkVersion flutter.minSdkVersion
    targetSdkVersion flutter.targetSdkVersion
    versionCode flutterVersionCode.toInteger()
    versionName flutterVersionName
}
To change the minSdkVersion we have to replace flutter.minSdkVersion with 21, as shown below:
defaultConfig {
    // TODO: Specify your own unique Application ID (https://developer.android.com/studio/build/application-id.html).
    applicationId "com.example.qr_code_scanner"
    minSdkVersion 21
    targetSdkVersion flutter.targetSdkVersion
    versionCode flutterVersionCode.toInteger()
    versionName flutterVersionName
}
Adding Permissions to the Info.plist File for iOS
Enabling camera access for QR code scanning on iOS requires adding an entry for the NSCameraUsageDescription permission in the ios/Runner/Info.plist file.
We can add the necessary permission by including the following lines within the <dict> tags. Ensure that the entries are below each other.
<key>NSCameraUsageDescription</key>
<string>This app needs camera access to scan QR codes</string>
Implementing the Mobile Scanner Package to Scan QR Codes in Flutter
Now that our project is set up with the Mobile Scanner package installed, the minSdkVersion changed, and the necessary permissions added, we can start creating a QR code scanner.
First of all, we will create a new file called qr_code_scanner.dart.
qr_code_scanner.dart
Inside this file, we will define the QrCodeScanner class, which will handle all the QR code-related functionality.
import 'package:flutter/material.dart';
import 'package:mobile_scanner/mobile_scanner.dart';

class QrCodeScanner extends StatelessWidget {
  QrCodeScanner({super.key});

  final MobileScannerController controller = MobileScannerController();

  @override
  Widget build(BuildContext context) {
    return MobileScanner(
      controller: controller,
      onDetect: (BarcodeCapture capture) {
        final List<Barcode> barcodes = capture.barcodes;

        for (final barcode in barcodes) {
          print(barcode.rawValue);
        }
      },
    );
  }
}
In the above code snippet, we start by creating a controller variable where we store an instance of the MobileScannerController. Afterward, we return a MobileScanner widget inside our build function.
Inside the MobileScanner widget we set the controller attribute to our controller variable. We also set the onDetect attribute to a function that prints out all the QR codes. Now our QrCodeScanner widget is ready to scan QR codes.
main.dart
Inside our main.dart file we created a simple HomePage widget with a button that shows the QrCodeScanner when clicked.
import 'package:flutter/material.dart';
import 'package:qr_code_scanner/qr_code_scanner.dart';
void main() => runApp(const MyApp());
class MyApp extends StatelessWidget {
const MyApp({super.key});
@override
Widget build(BuildContext context) {
return const MaterialApp(
home: HomePage(),
);
}
}
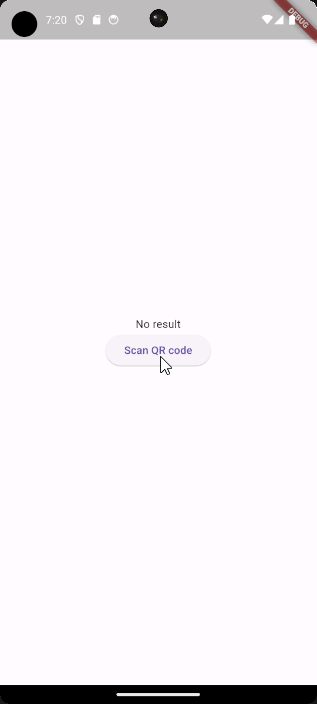
class HomePage extends StatelessWidget {
const HomePage({super.key});
@override
Widget build(BuildContext context) {
return Scaffold(
body: Center(
child: Column(
mainAxisAlignment: MainAxisAlignment.center,
children: [
const Text('No result'),
ElevatedButton(
child: const Text('Scan QR code'),
onPressed: () => Navigator.of(context).push(
MaterialPageRoute(
builder: (context) => QrCodeScanner(),
),
),
),
],
),
),
);
}
}In the above code, we use the Navigator.of(context).push function to push a new MaterialPageRoute which includes our QrCodeScanner on top of our stack. This is necessary because we want the QrCodeScanner to take up the whole screen.
Afterward, you can run the application either on your physical device or using an emulator. In the next section, we will set up an Android emulator to ensure that it shows a QR code.
Scanning QR Codes with an Android Emulator
First, you have to start your Android emulator, after that, you can run the main.dart file.
After running the main function, the application will build and display the HomePage widget. When we press the “Scan QR-code” button, a pop-up will appear, requesting camera access permission. Once granted, the camera will open, and the Android emulator will simulate an apartment.

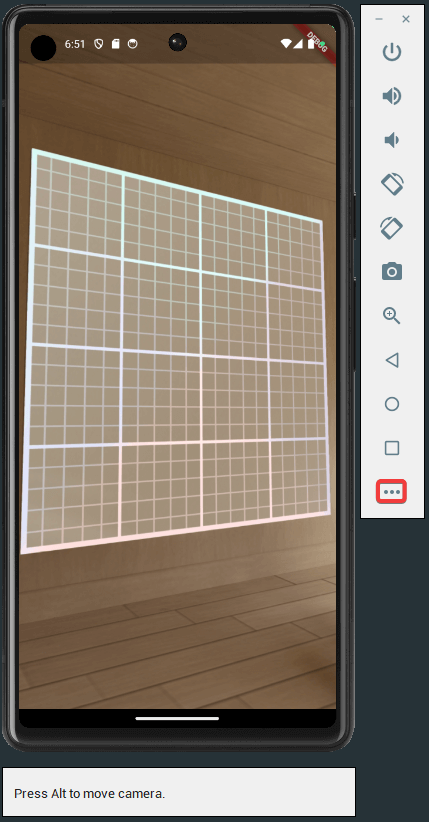
Inside the apartment, you can look around by holding the alt key and using your mouse to drag the screen. To move around, use the WASDQE keys while holding the alt key. Once familiar with the keys make your way toward the dining room as done in the GIF below:
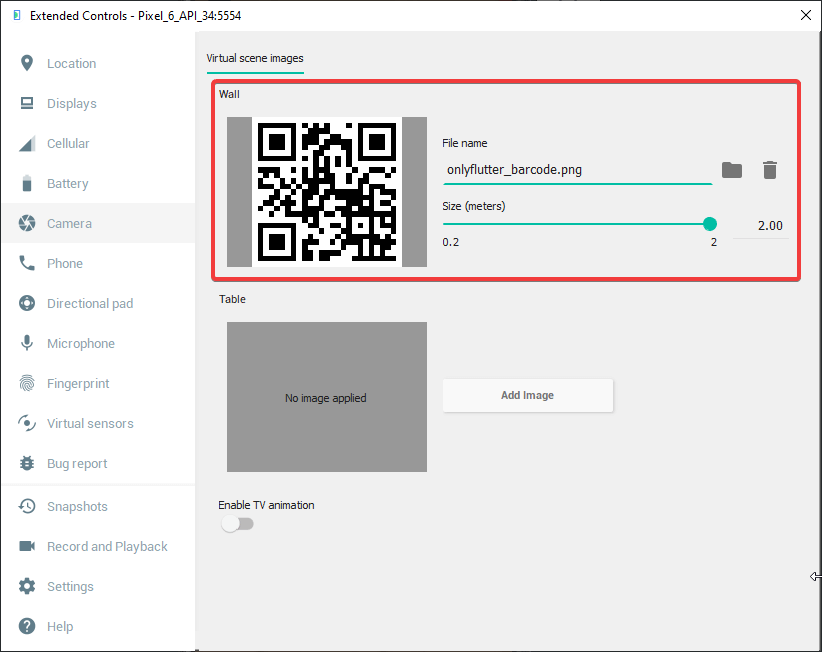
In the dining room, you will notice a placeholder on the wall. We have the option to replace this placeholder with an image of our choice, which in this case will be a QR code. You can generate a QR code using the following website: QR-code generator.
To replace the placeholder on the wall we need to go through the following steps:
1. Click the three dots on the right side of the emulator to open the options:
2. Navigate to “Camera”, and click on “Add Image” to select a QR code for the wall.

3. Once you selected your QR code, you should see the following:
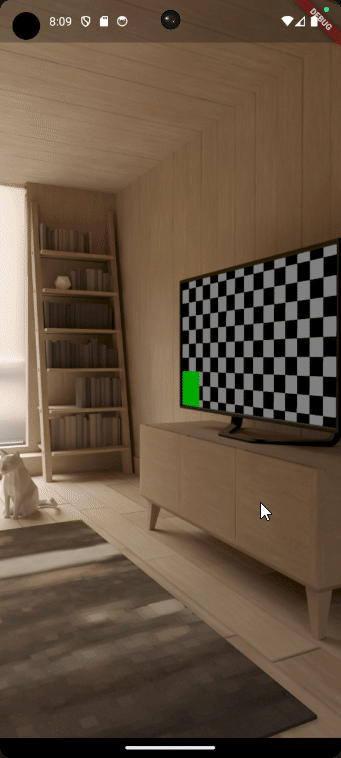
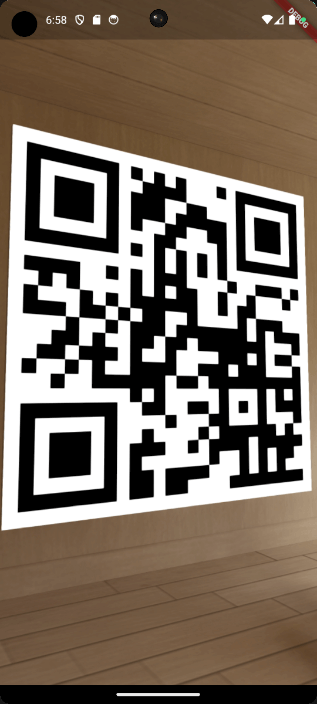
4. Now, as we run our application again, you will notice that the QR code is displayed on the wall:
After setting up the emulator correctly, we can continue to test our QR code scanner. If you keep your application running, you will notice that the QR code scanner continuously detects and scans the QR code. It also shows the output inside your terminal.
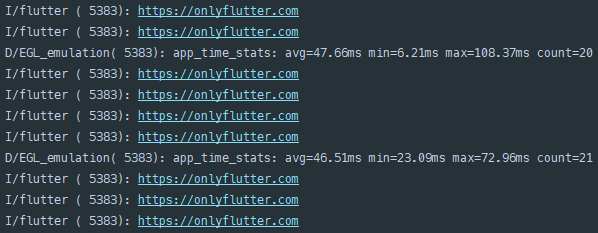
In this example, the QR code returns the value https://onlyflutter.com.
We do not want the QR code scanner to keep on scanning even when it finds a valid QR code. So let us continue to the following section where we will ensure that the QR code scanner stops scanning when it successfully finds a QR code.
Closing the QR Scanner After a Successful Scan
To close the QR code scanner we want to ensure that the camera closes as soon as we have scanned the QR code. We also have to pass the QR code to our Text widget so we can display it.
qr_code_scanner.dart
To ensure that the camera is closed after a successful scan we have to make the following changes to the QrCodeScanner widget.
import 'package:flutter/material.dart';
import 'package:mobile_scanner/mobile_scanner.dart';

class QrCodeScanner extends StatelessWidget {
  QrCodeScanner({
    required this.setResult,
    super.key,
  });

  final Function setResult;
  final MobileScannerController controller = MobileScannerController();

  @override
  Widget build(BuildContext context) {
    return MobileScanner(
      controller: controller,
      onDetect: (BarcodeCapture capture) async {
        final List<Barcode> barcodes = capture.barcodes;
        final barcode = barcodes.first;

        if (barcode.rawValue != null) {
          setResult(barcode.rawValue);

          await controller
              .stop()
              .then((value) => controller.dispose())
              .then((value) => Navigator.of(context).pop());
        }
      },
    );
  }
}
In the above code snippet, we have added the setResult attribute that needs to be set inside the constructor of the QrCodeScanner widget. Inside the onDetect attribute of the MobileScanner widget we save the first barcode inside the barcode variable. Afterward, we check if the rawValue of the barcode is not null.
When the rawValue is not null we call the setResult function, to ensure that the controller is stopped and disposed of. Afterward we pop the QrCodeScanner off the stack.
main.dart
Because of the changes in the QrCodeScanner widget we also need to adjust our HomePage widget.
import 'package:flutter/material.dart';
import 'package:qr_code_scanner/qr_code_scanner.dart';

void main() => runApp(const MyApp());

class MyApp extends StatelessWidget {
  const MyApp({super.key});

  @override
  Widget build(BuildContext context) {
    return const MaterialApp(
      home: HomePage(),
    );
  }
}

class HomePage extends StatefulWidget {
  const HomePage({super.key});

  @override
  State<HomePage> createState() => _HomePageState();
}

class _HomePageState extends State<HomePage> {
  String? _result;

  void setResult(String result) {
    setState(() => _result = result);
  }

  @override
  Widget build(BuildContext context) {
    return Scaffold(
      body: Center(
        child: Column(
          mainAxisAlignment: MainAxisAlignment.center,
          children: [
            Text(_result ?? 'No result'),
            ElevatedButton(
              child: const Text('Scan QR code'),
              onPressed: () => Navigator.of(context).push(
                MaterialPageRoute(
                  builder: (context) => QrCodeScanner(setResult: setResult),
                ),
              ),
            ),
          ],
        ),
      ),
    );
  }
}
In our HomePage widget, we added a new private variable called _result and function called setResult, which takes a String parameter and updates our _result variable using setState.
Finally, we pass this setResult function as a parameter to the QrCodeScanner widget. Now the QR code scanner will close after finding a QR code and assigns it to our Text widget, as done in the GIF below:
Conclusion
In this post, you have learned how to scan QR codes in Flutter using the Mobile Scanner package. You know what platform changes to make to scan QR codes on both Android and iOS. As shown the MobileScanner widget is easy to implement and scans QR codes very quickly.


I set the qr code to the wall but it still empty. How to fix this?
Once added, it shouldn’t be empty. Did you try adding the QR code to the table as well? Perhaps this one will work? Otherwise, I advice you to restart your emulator with a cold boot, let me know if it worked.